

Getting started
The interface
The menu bar, the panels on the left, the board, undo and redo, the window of a device, presentation mode, the terminal and the guided tour.
The screen has a bar along the top, a strip of buttons down the left, and the board, where the drawing is. What you open from the buttons appears over the board: a panel at the left, a window of the terminal, the window of a device. This page names each part as it is named on screen.
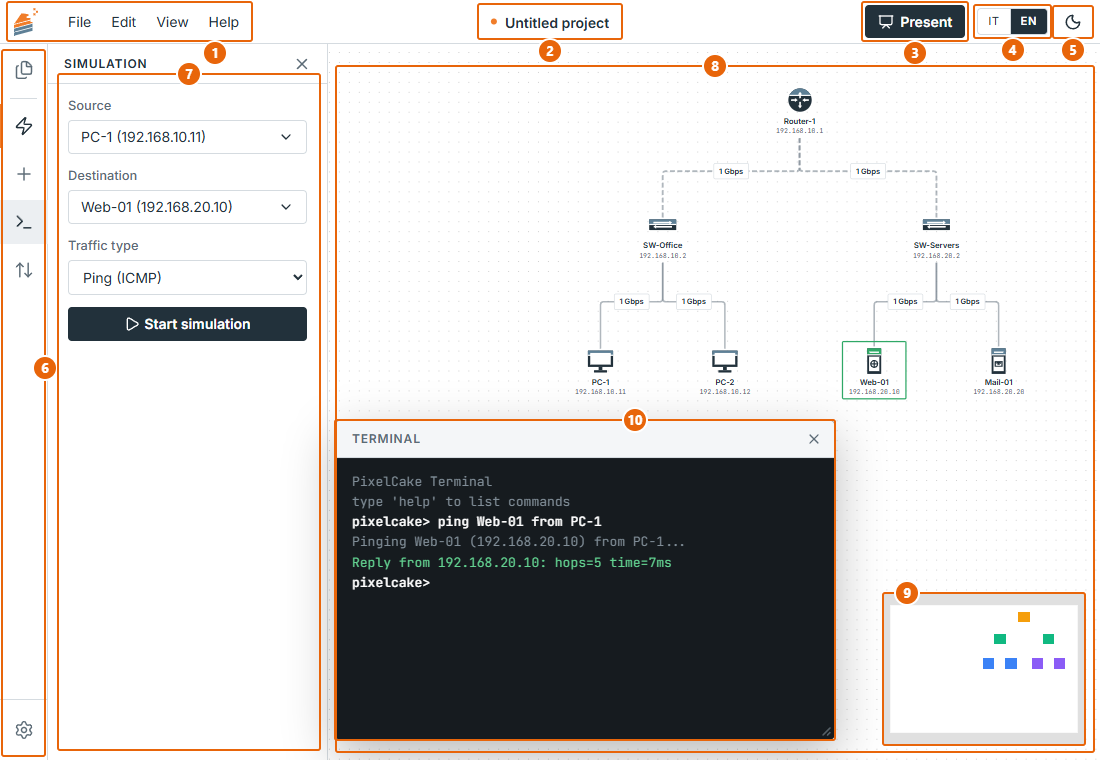
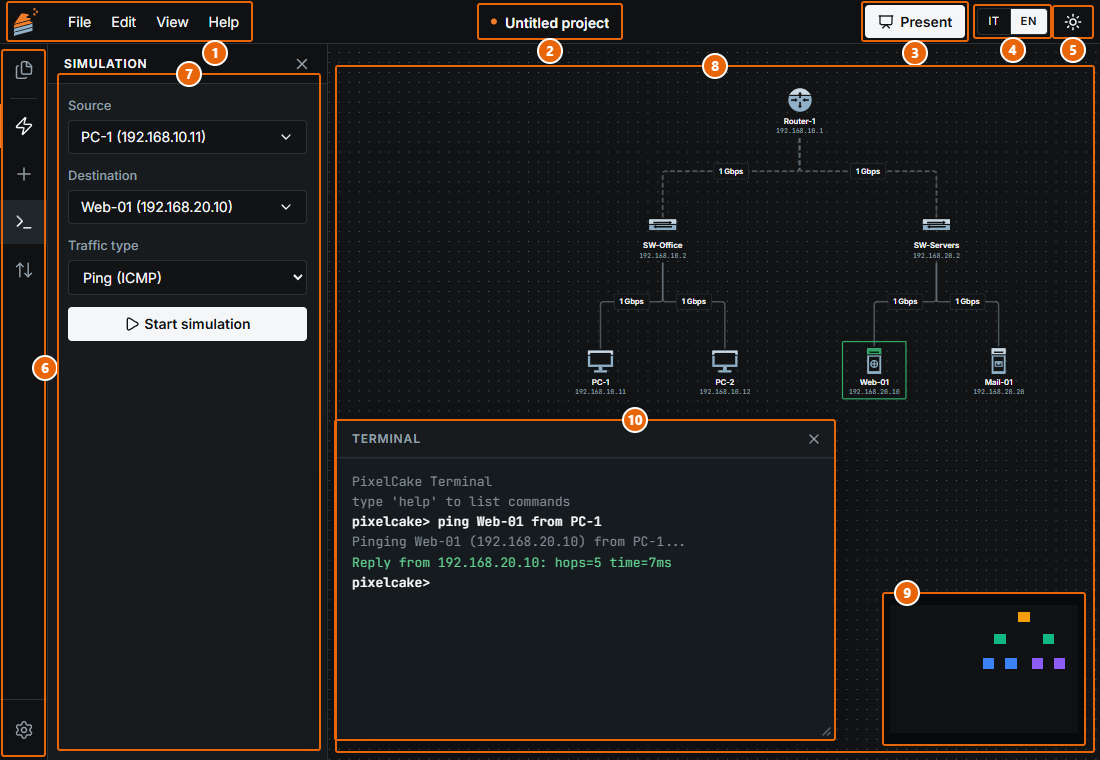
- The menus: File, Edit, View and Help, with the logo before them.
- The name of the project.
- “Present”, which starts presentation mode.
- The switch between IT and EN: see Languages and themes.
- The button of the theme, light or dark.
- The strip of buttons on the left: “Explorer”, “Simulation”, “Add device”, “Console”, “Import/Export”, and “Settings” at the bottom.
- The side panel that one of the buttons opens, here “Simulation”.
- The board.
- The small map, at the bottom right of the board.
- The terminal, in a window of its own.
The menu bar
On the left, the logo opens the PixelCake website in a new tab, and the four menus open when the pointer rests on them:
| Menu | What is in it |
|---|---|
| File | “New project…”, “Open…”, “Save”, “Save as…” and “Export image…”. See Saving, opening, files and Exporting an image. |
| Edit | “Undo”, “Redo”, “Copy”, “Paste” and “Enclose in an area”. See Undo and redo. |
| View | “Fit to window”, “Presentation mode”, “Auto-layout” (“Vertical” or “Horizontal”), “Connect devices with no cable”, “Magnify”, “Animation”, “Show areas” and “Annotation mode”. |
| Help | “Guide”, “Documentation”, “Terminal commands”, “Guided tour”, “Show the welcome screen”, “About” and “The PixelCake website”. |
“Guide” is the short guide inside the app. “Guided tour” takes the tour of the first visit again. “Documentation” opens these pages, in the language of the interface, in a new tab. “Show the welcome screen” brings back the first screen, on an empty board only.
In the middle of the bar is the name of the open project. A click on it opens the Explorer. A small orange dot before the name says that the project has changes not saved to a file yet.
On the right are “Annotation mode”, the button with the marker that turns on the transparent layer to write and draw on the board (Annotation mode), with the number of annotations hidden while it is off, “Present”, the switch between IT and EN, and the button of the theme.
The panels on the left
The strip of six buttons opens and closes the panels. Each button names itself when the pointer rests on it.
| Button | What it opens |
|---|---|
| “Explorer” | The panel “Explorer”: the name and the description of the project, its boards, and “Save to file” and “Open file…”. |
| “Simulation” | The panel “Simulation”: “Source”, “Destination”, “Traffic type” and “Start simulation”. See The simulation panel. |
| “Add device” | The panel “Add”, with two tabs: “Devices”, the device types and “Bulk add” and “Area”, and “Samples”, the five sample networks. |
| “Console” | The terminal, in a window of its own. |
| “Import/Export” | A window to export the network of the board as YAML, or to load it from a YAML file. See YAML. |
| “Settings” | A window with four tabs: “Network”, “Appearance”, “Templates” and “Advanced”. |
A panel covers the left of the board, and the zoom buttons that sit there, while it is open. The cross at its top right closes it, and so does a second click on its button.
The board
The board is where the drawing is. What the mouse does on it:
- drag a device to move it; drag from the edge of a device to another to join them;
- drag on empty space to draw a selection box, and Ctrl + click to add a device or an area to the selection; with two devices selected or more, “Enclose in an area” appears above them;
- drag with the right button on empty space to move the view, and use the wheel to zoom;
- right-click a device for its menu: “Details (edit)”, “Console”, “Enclose in an area” and “Delete”; right-click a cable for “Edit link” and “Delete link”;
- click an empty spot to clear the colours left by the last question.
At the bottom left are the buttons that zoom in, zoom out, fit the drawing to the window and lock the devices in place. At the bottom right the small map shows the whole drawing as coloured squares, with the part in view in white. View → “Fit to window” brings every device into view. Every shortcut is listed in Keyboard and mouse.
Undo and redo
Edit → “Undo”, or Ctrl + Z, takes back the last change to the drawing. Edit → “Redo”, Ctrl + Y or Ctrl + Shift + Z, makes it again. On a Mac the keys are Cmd + Z and Cmd + Shift + Z. With the pointer on “Undo” or “Redo”, the menu says which change it is, with the name of the device, the link or the area. An entry is grey while there is nothing to take back or to make again.
One action is one step:
- a device added, pasted or deleted, with the cables and the areas that went with it;
- a drag, from the press of the button to its release, also of several devices together, and a step of the arrow keys;
- a cable drawn or deleted; an area made, moved, resized, renamed, recoloured or deleted;
- “Save” in the window of a device or of a link, with everything changed there;
- a command of the terminal that changes the drawing, such as
set iporconnect; - a YAML import, a bulk add, an auto-layout, a “Connect devices with no cable”.
These are not steps, and are not undone: moving or zooming the view, the selection, opening and closing windows, a question and its answer, the failures simulated in a presentation, the network settings of the project (Settings → Network), the theme and the language. The boards themselves are not either: adding, renaming, duplicating or deleting a board.
Each board keeps its own steps, the last 100, for as long as the page is open: switch to another board and back, and they are still there. A new change after an undo takes away what could have been redone. Opening or creating a project starts again with no steps, and so does loading a sample on a board. The steps are not saved, neither in the browser nor in the project file: after a reload of the page there are none. An undo is a change of the project like any other, and leaves it with changes not saved to a file.
In a text field, and in the line of the terminal, Ctrl + Z undoes the text typed, as anywhere. While a window is open over the board, and while presenting, the keys do nothing.
The window of a device
A double click on a device, or right-click and “Details (edit)”, opens its window. Its tabs depend on the kind of device: “General” for all; “Ports” for switches, routers and firewalls; “Network cards” for the others; and, where they make sense, “Routes”, “Rules”, “NAT”, “DHCP” and “DNS”.
Nothing changes until you click “Save”. “Cancel” closes the window and leaves the device as it was. A problem with a value is written under its field as you type. See Devices.
Presentation mode
“Present” puts the drawing tools away: the drawing stays, fitted to the window and no longer editable with the mouse, with a panel beside it. You click two devices to ask a question, then break a device or a cable to see what stops. “Exit”, or the Esc key, brings the tools back. See Presentation mode.
The terminal
“Console” opens the terminal in a floating window, titled “Terminal”, over the board. Drag it by its title bar, resize it by the grip at its bottom right corner, and close it with the cross. The board stays usable around it, and what you type changes the drawing you see. The window is always dark, in either theme.
Right-click a device and choose “Console” to open it already on that device. The commands are in English in both languages. See the terminal reference.
The guided tour
On a first visit, once the welcome screen is left, a guided tour of eight steps goes over the screen: adding a device, joining two devices with a cable, asking a question in the “Simulation” panel, the terminal, undo and redo, saving the project to a file, annotation mode and presentation mode. Each step frames one part of the screen in orange and dims the rest, with a balloon of a sentence or two beside it. “Next” and “Back” go through the steps, and “Skip” closes the tour at any step; the arrow keys, Enter and Esc do the same (Keyboard and mouse).
It comes by itself once in a browser, and not in a browser that already holds a drawing made before the tour existed. Help → “Guided tour” opens it again from the first step, at any time. In a window narrower than 600 pixels the balloon sits at the bottom of the screen, and a step whose button is not on the bar there points at the View menu, where the same entry is.